How to Create and Run Your Personal Internet Radio with Icecast on Linux OS
How to Create and Run Your Personal Internet Radio with Icecast on Linux OS
Quick Links
- Installing Icecast
- Initial Configuration
- Choosing a Source Client
- Choosing a Listener Client
- Additional Configuration
- Promoting Your Station
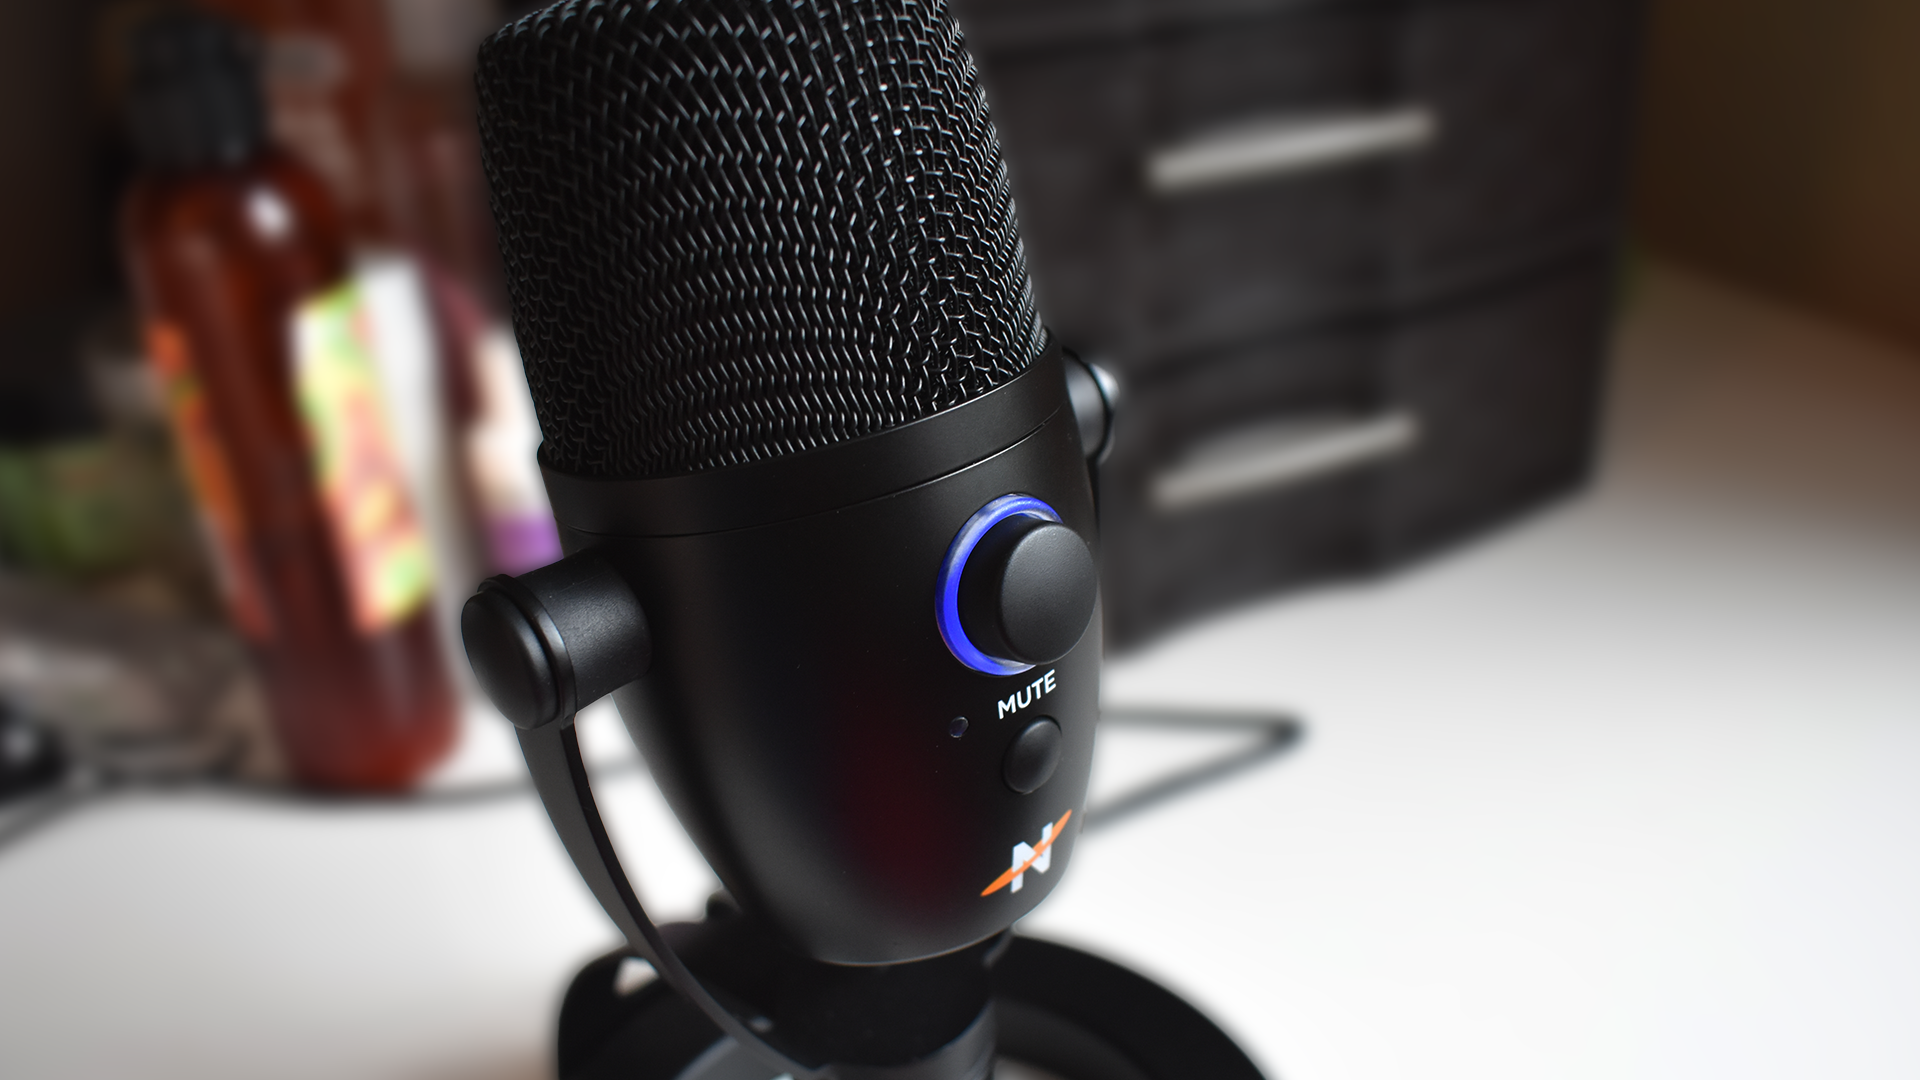
Ever wanted to start your own radio station that you and your friends can enjoy? You can, with Icecast. In this article we’ll create a simple online streaming radio.
Icecast is an open-source HTTP / standards-based live media streaming server created by the Xiph.org Foundation . It’s used for everything from small home radio & jukebox projects to large corporate internet radio stations, and everything in between. To start, all you’ll need is a computer and a connected microphone. Icecast is available for Linux/Unix and Windows. Similar projects exist, such as Shoutcast , Snapcast and AzuraCast . We’re going to use Icecast here as it’s the most suitable and straightforward setup process for a DIY streaming radio station.
License requirements to run an Internet radio station vary by country. If you plan on streaming copyrighted material, you must obtain appropriate licenses from copyright authorities, and/or get explicit permission from all copyright holder(s). Please consult the laws in your country for specific requirements. For more info, check out the the Wikipedia page on internet radio broadcasing .
Installing Icecast
You can download Icecast using your distribution’s package manager, which is the method we’ll use in this article.
As with many software projects, if you want the most recent version of Icecast, download and build the source directly from the official website or clone the public Git repository . Version 2.5 is near completion at the time of writing and has many new features, including a complete overhaul of the web UI—but is not included in distros just yet.
For Debian based distributions, install the icecast2 package using apt:
sudo apt install icecast2

For Redhat distros, use dnf to install the icecast package:
sudo dnf install icecast


Initial Configuration
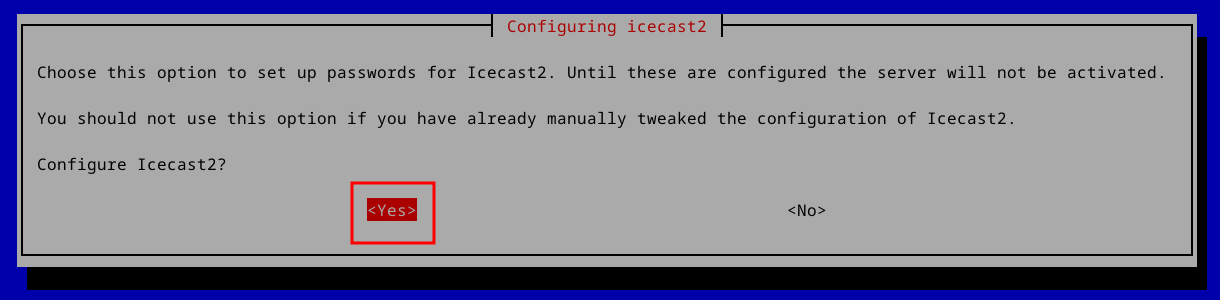
So you’ve installed Icecast. Now what? Debian distros will run a post-install script which helps you configure things. At the first dialog, hit the left arrow key to select “Yes” and then hit Enter:
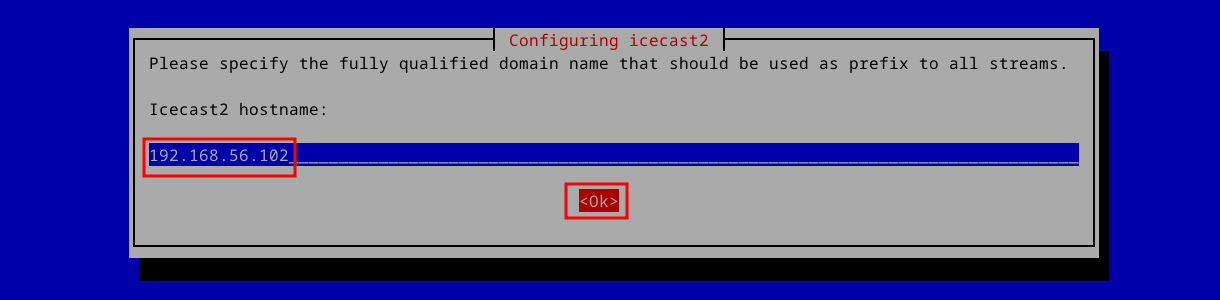
Since we’re setting up a private radio stream, we’ll enter the machine’s LAN IP at the next prompt:
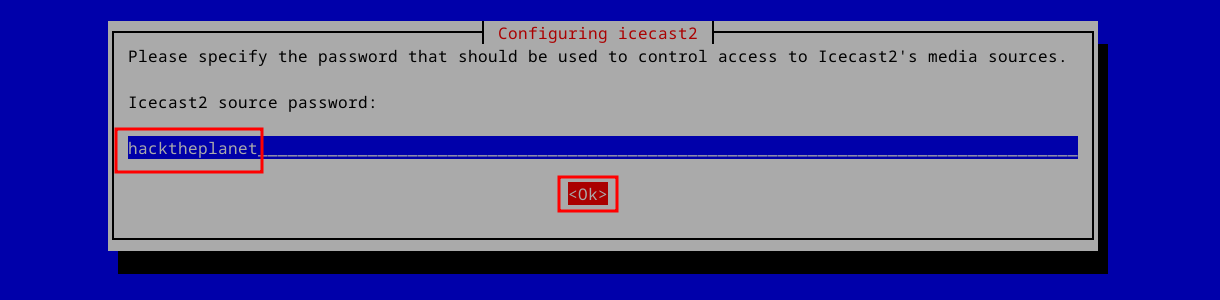
A source client is the program you use that streams media files (or live audio) to the server. The source password authenticates with Icecast to allow you to start a stream. I recommend a unique password and not the default (which is “hackme”). Maybe something like:
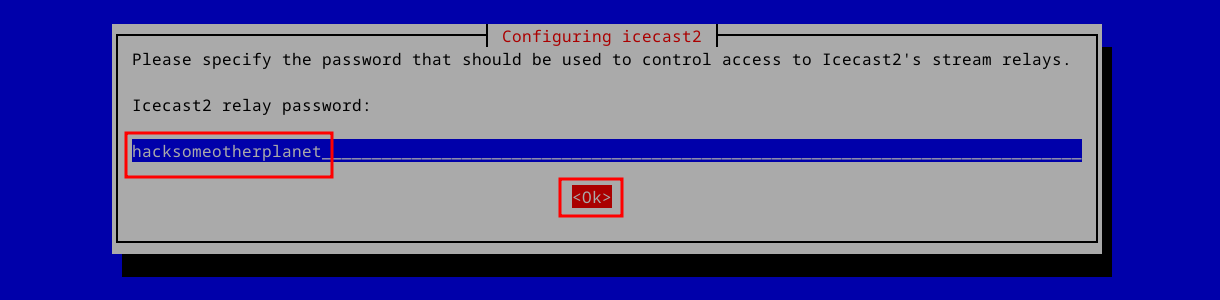
Relays are useful in larger setups for distributing listener load to multiple servers. We won’t be setting up relays here, so you can enter whatever you want (but again I recommend changing the default):
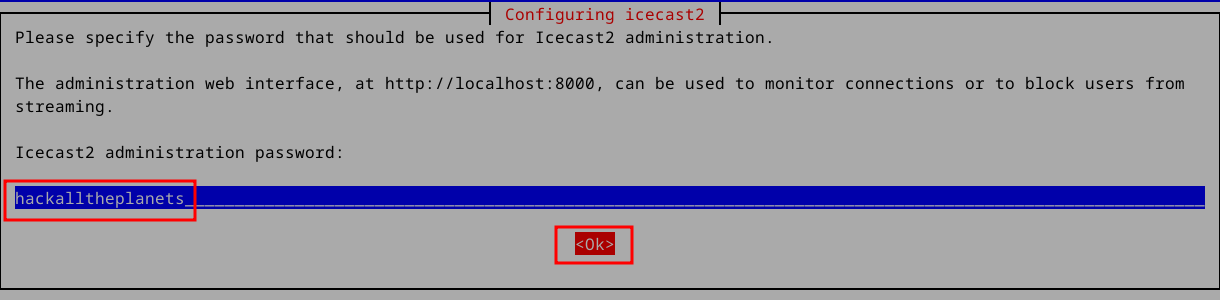
Finally, we’re asked for the admin user password. You’ll use this to access Icecast’s web interface admin section. Change the default to something unique:
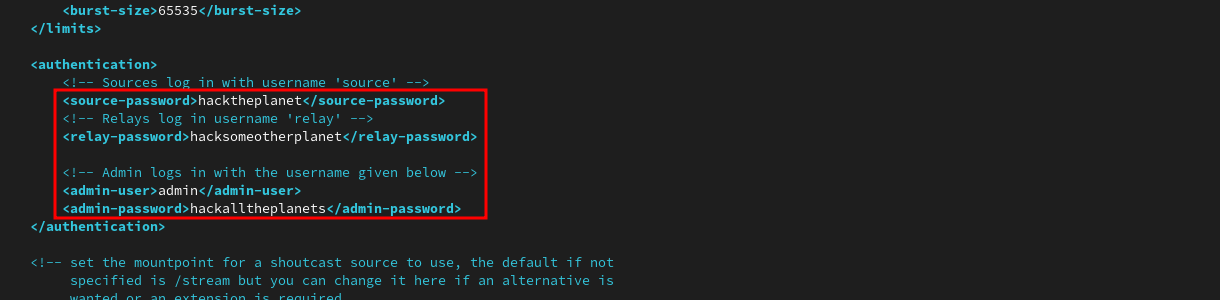
Redhat distros simply return to the command prompt after installing. No big deal, we’ll set things up directly in the configuration file, located at “/etc/icecast.xml”. Fire up your favorite text editor and let’s get to work:

The default configuration is well-thought-out for most simple installations like ours. Icecast developers recommend the best practice of changing as little as possible, and fine-tune afterwards to suit your needs.
First, change passwords from their defaults:
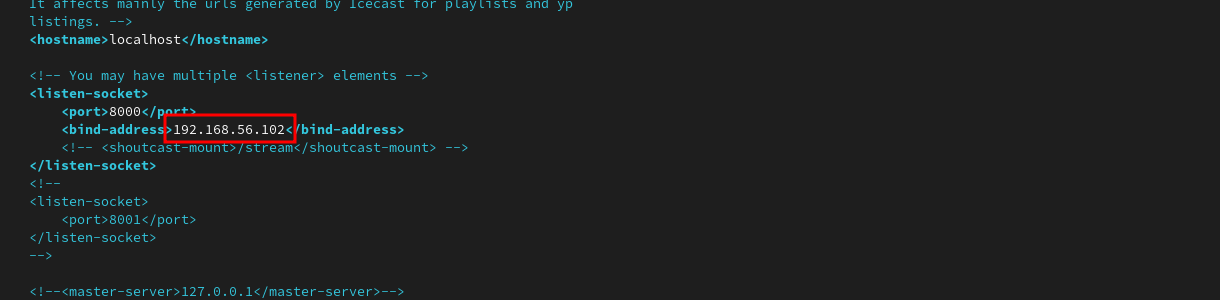
Next, change the bind-address to your server’s LAN IP address:
Save the configuration file, then restart Icecast for our changes to take effect:

Let’s verify that we’re up and running:
sudo systemctl status icecast.service

Great! Now that Icecast is up, let’s get started on our source client.
Choosing a Source Client
There are 3 primary components of Icecast streaming: the source client, the Icecast server, and the listener client. They are all independent of each other and can all (and many times do) operate on different machines. A source client is what actually plays your music files, or streams live audio to Icecast. Icecast then distributes that stream to listeners via the HTTP protocol. It goes a little something like this:
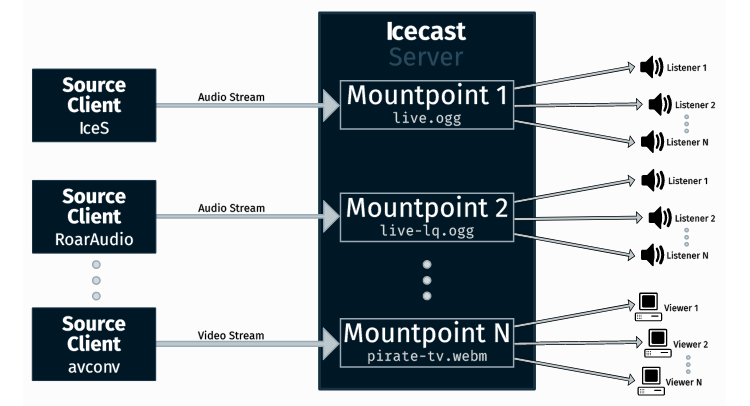
ePirat / Xiph.org Foundation
Choosing the right source client for your setup depends on many factors. Some questions you may consider when deciding will include:
- Will I stream pre-recorded sound/music files?
- Will I stream live audio from microphones and mixing consoles?
- Will I broadcast from a desktop/laptop or a mobile device (or both)?
- Do I have operating system constraints or requirements?
There’s a non-exhaustive list of source clients on the Icecast Apps page .
For this tutorial we’ll use a feature-rich yet easy-to-use source client made by Daniel Nöthen called Broadcast Using This Tool (BUTT for short—don’t ask me whether this acronym was intentional or not!). We’ll use BUTT to livestream from our microphone to Icecast. BUTT is available for Linux, macOS and Windows. You can get it from the official download page .
Configuration is pretty straightforward. From the main window, select the “Settings” button, then on the “Main” tab, under “Server Settings”, click the “Add” button. A new window pops up to configure your server.
Choose a name for this server’s config (multiple server configurations are supported) and select the “Icecast” radio button. Fill out the IP address as well as port (default port is 8000) of your Icecast server, along with your source password. Under “Icecast Mountpoint”, add .OPUS to the end (Adding an extension helps some listener clients determine which codec is being used). Leave the “Icecast User” as source and “Use legacy Icecast protocol” unchecked. Click “Add” and then, under the parent window, click “Save”.
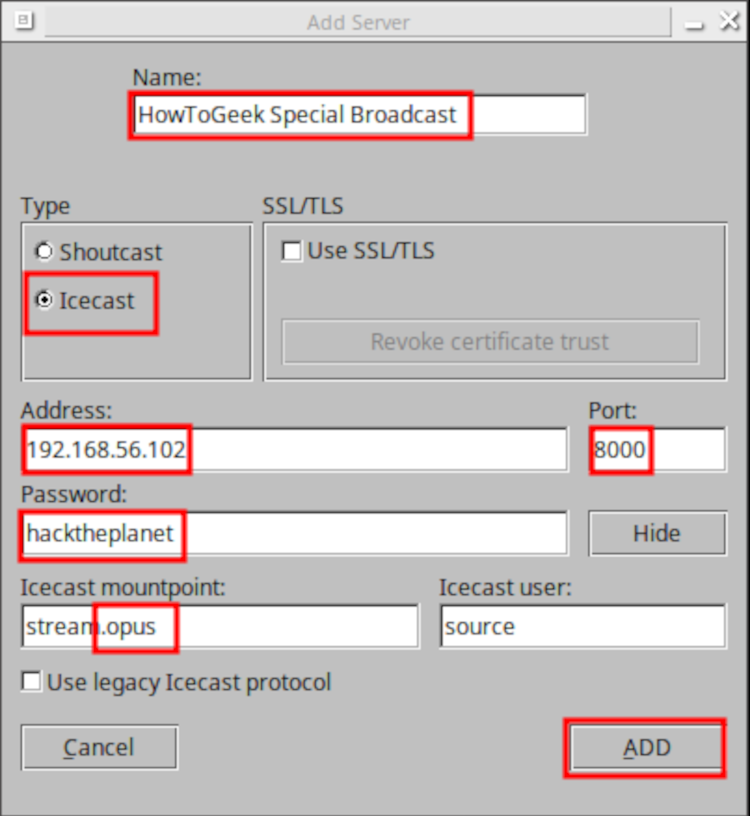
The test setup here uses non-TLS communications on port 8000. Icecast fully supports SSL/TLS encryption but creating certs is outside the scope of this tutorial. I highly recommend using TLS if you decide to make your stream accessible from anywhere outside your private, local network!
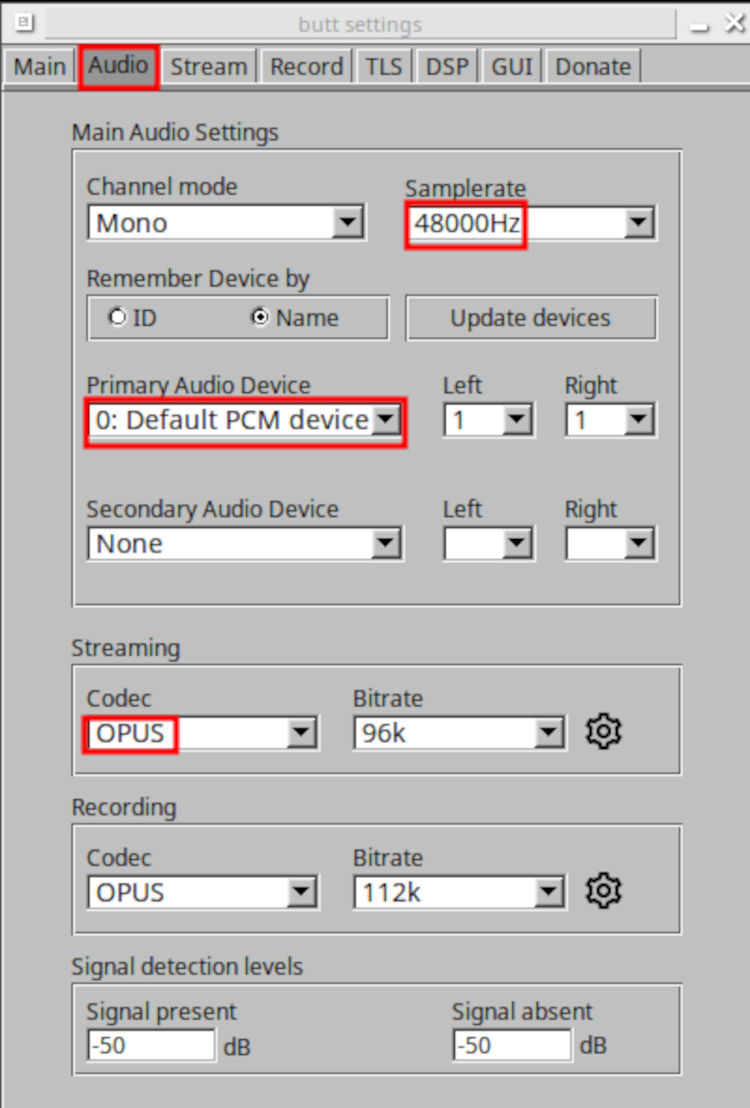
Ok, let’s talk sound! Following in the spirit of F/OSS, we’ll use Opus (a totally open, royalty-free, highly versatile and widely supported audio codec, also created by Xiph.org) for our stream.
From “Settings”, click the “Audio” tab. Set “Samplerate” to 48000Hz (required by Opus), verify “Primary Audio Device” is where your microphone is connected and set “Streaming Codec” to Opus:
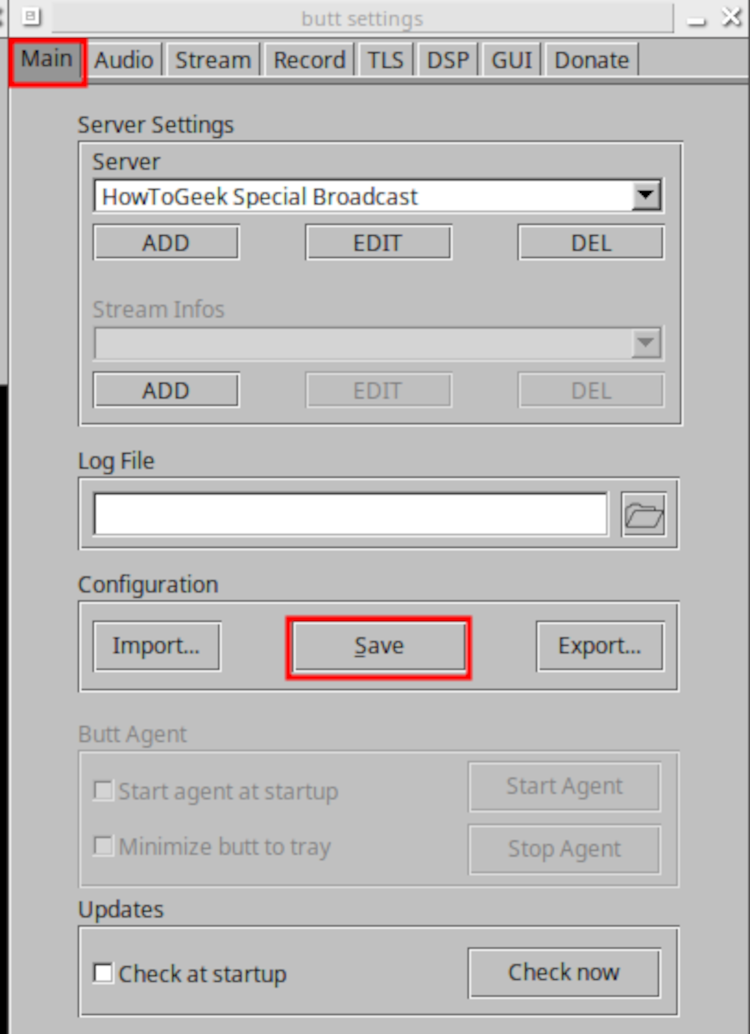
Finally, go back to the “Main” tab and click “Save”:
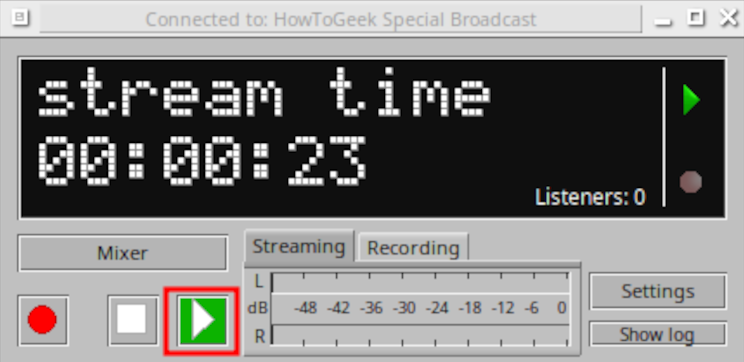
From here you can close the “Settings” window. When you’re ready, click on the “Play” button, which will start your stream. If you’ve configured everything correctly, you’ll currently be making your server’s radio stream debut!
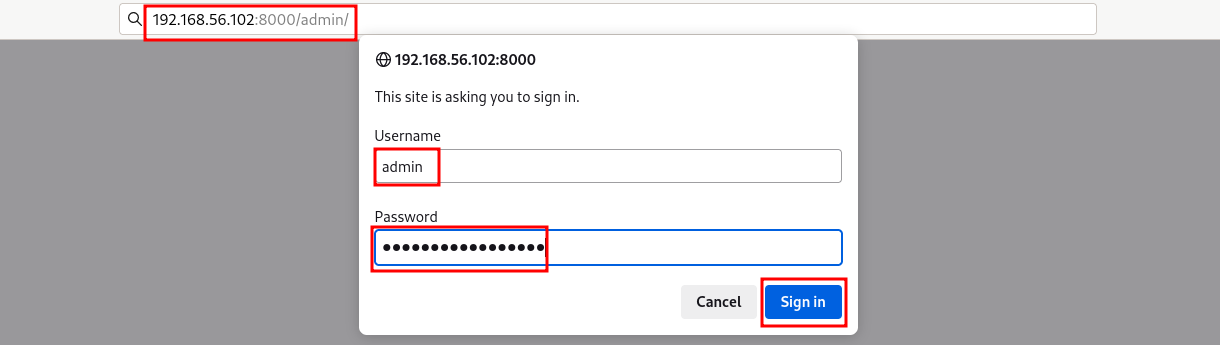
Cool! Now let’s log into the Icecast web UI at “http://LAN\_IP:8000/admin/ “ and enter “admin” for the username along with your configured Icecast admin password:
Select “Mountpoint List” from the main Admin page:

Copy the “M3U” hyperlink:

This link, minus the .M3U extension, is what you will use to listen with your web browser.
Choosing a Listener Client
Listener clients in general require very little configuration. Thanks to HTML5 audio , you can simply point a web browser to your new stream URL. Here’s a list of browser supported HTML5 audio encoding formats .
Using a web browser, paste the stream URL you copied above into the address bar (again, removing the .M3U extension) and hit Enter.
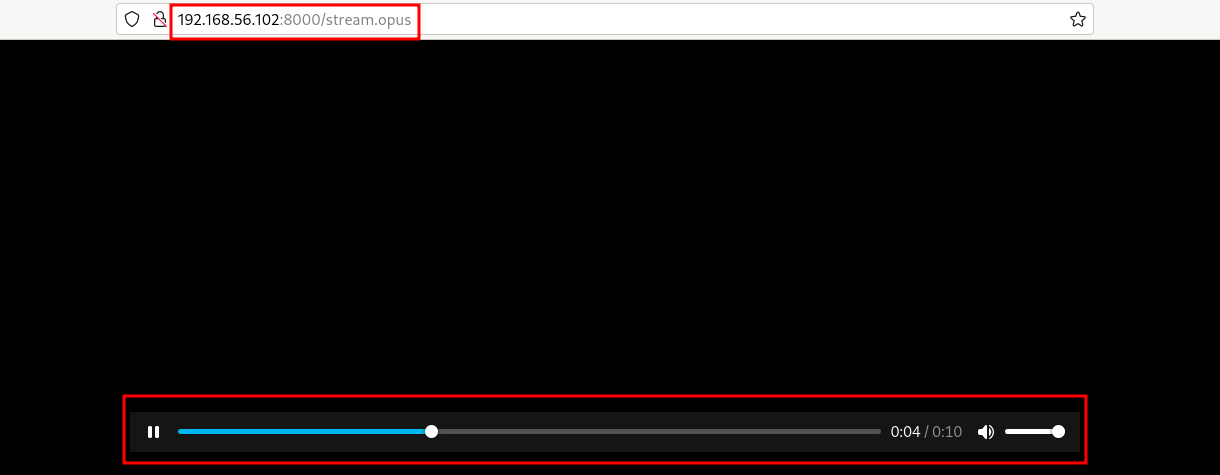
Do you hear your stream? That’s Icecast at work.
Additional Configuration
Icecast has many advanced features. Some of them are:
- Multiple simultaneous streams on a single server
- A “fallback” system which can programmatically move listeners between mountpoints
- Relay functionality, distributing your streams across multiple servers
- “URL Authentication”, authenticating users against a dedicated server/database (v2.5+)
- Built-in chroot ability
- Publishing your stream in the Icecast YP directory
- Shoutcast compatibility mode
These features and more are very well explained in the official Icecast documentation .
You can also use port forwarding to access your stream from outside your local network.
Promoting Your Station
Promoting really depends on the type of station you create. If it’s just for fun, telling a good friend will suffice! If you want more exposure: listing in the Icecast directory, creating a quality website around it and executing a comprehensive marketing campaign on social media is a surefire way to gain some attention online.
The most important piece of information I can give you when building your first streaming radio station is to have fun! The result is very rewarding and full of exciting moments that you’ll treasure forever.
Also read:
- [New] Step-by-Step Guide to Implementing Borders on Instagram Images
- [Updated] In 2024, The Art of Angle Alteration Mastering the Rotation Ritual on Instagram
- 2024 Approved Maximizing Velocity in Real-Time Periscope Livestreams
- Blissful Movie Moments Your Summertime Classic List
- Breezy Fixes to Jumpstart Windows Updates Stalled at the Start Line
- Comprehensive Guide: Understanding the TIFF Image Format
- Effortlessly Switch From WebM to MOV Format for Optimal Online Video Experience
- High-Quality Video Calling Solutions Top 10 Best Apps Ranked for 2024
- The Comprehensive Breakdown of XAVC Technology – Why It Matters for Prosumers and Enthusiasts
- Top No-Cost Solutions for Converting MKV Files to iPad 2 Format
- Undelete lost music from 12
- Unleash Your Inner Influencer 9 Essential Instagram Steps for 2024
- Title: How to Create and Run Your Personal Internet Radio with Icecast on Linux OS
- Author: Kenneth
- Created at : 2024-09-25 08:44:52
- Updated at : 2024-09-26 04:16:57
- Link: https://media-tips.techidaily.com/how-to-create-and-run-your-personal-internet-radio-with-icecast-on-linux-os/
- License: This work is licensed under CC BY-NC-SA 4.0.