
Four Methods for Capturing Screenshots on Your iPad
Four Methods for Capturing Screenshots on Your iPad
5KPlayer > AirPlay > iPad Screen Recording
Disclaimer: This post includes affiliate links
If you click on a link and make a purchase, I may receive a commission at no extra cost to you.
How to Record iPad Screen?
Written by Kaylee Wood | Last update: October 10, 2020 | 5 Min Read
As long as you know how to screen record iPad, you can do following things very easily.
Making a video tutorial: How to perform a task, how to use an app, or how to play a game on iPad can be explained in a visual way.
Record live streaming: No matter you are enjoying a live concert or broadcast, watching a movie or TV show, or just having a net class or online meeting, you can use iPad screen recording function to capture whatever you want to save on iPad.
Create a demonstration video: Making a preview video to showing off your new app to increase downloads, or showing off anything on your iPad you want to show to others by creating a demonstration video.
Now that you are in dire need of recording iPad screen, the below four ways will help you out.
Main methods:
1. Inbuilt iPad screen recording function
2. Third-party iPad screen recorder app
3. QuickTime – wired way
4. 5KPlayer – wireless way
4 Ways to Screen Record iPad Contents
Method 1. Using the Screen Recording Function Built in iPad
iPad with iOS 11 or later and iPadOS has an embedded screen recorder that you can use to screen record iPad with sound. It is quite convenient to capture any operations quickly without need to open a third-party screen recorder app. However, you may have to jump to the below ways as this method is only available for somewhat new iPad models.
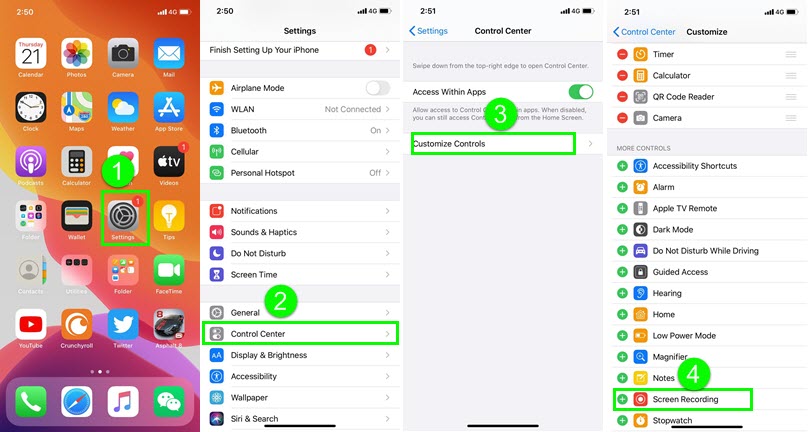
Step 1. Add iPad screen recording function to Control Center
Go to Settings > Control Center > Customizable Controls > tap the “plus” icon ![]() next to Screen Recording to add it to Control Center > Go back to the UI of iPad
next to Screen Recording to add it to Control Center > Go back to the UI of iPad
Step 2. Activate iPad screen recording
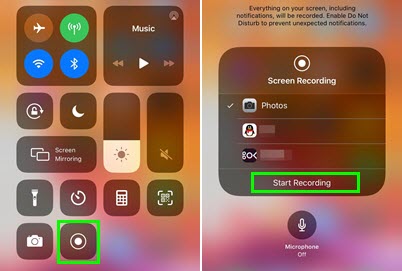
1. Swipe up from the bottom of any screen if you have an iOS 11 iPad, or swipe down from the upper-right corner of the screen if you have an iPad with iOS 12 or iPadOS.
2. Firm press the icon ![]() and tap Microphone to turn on it if you want to screen recording iPad with sound or turn off it to record no sound. Here, you can also choose a different destination for the screen recording other than the Photos library.
and tap Microphone to turn on it if you want to screen recording iPad with sound or turn off it to record no sound. Here, you can also choose a different destination for the screen recording other than the Photos library.
3. Tap Start Recording, and wait for the three-second countdown.
Step 3. Start recording iPad screen
When the icon ![]() turns red, it means the recording starts. Now, do operations on your iPad and every action will be recorded.
turns red, it means the recording starts. Now, do operations on your iPad and every action will be recorded.
Step 4. Stop iPad screen recording
Open Control Center and tap ![]() to stop the recording. Alternatively, tap the red icon with a timer on the upper-right corner of your iPad screen and then a message will pop up to allow you to stop recording. Now, you can find the recording file in Photos and trim it.
to stop the recording. Alternatively, tap the red icon with a timer on the upper-right corner of your iPad screen and then a message will pop up to allow you to stop recording. Now, you can find the recording file in Photos and trim it.
Cons of this way:
* Only available to iPad with iOS 11 or later and iPadOS.
* Some apps might not allow you to record audio.
* iPad screen recording and iPad screen mirroring functions cannot be used at the same time.
* This inbuilt iPad screen recorder won’t enable you to make a copy of a video from streaming services like YouTube and Netflix, but all is a black screen.
Method 2. Downloading Third-party Screen Recording App
There are a variety of third-party iPad screen recorder apps in App Store for you to choose from, including Screen Recorder +, Record it!, Screen Recorder, DU Recorder and Screen Recorder-EX as the best ones. Just free download one in App Store, and use it to record your iPad screen. Kindly remind, these items are all in-purchase apps that you have to pay some money for advanced services like trimming the recording.
Cons of this way:
* Not totally free.
* The installation occupies the storage space of your iPad.
* Crashes often.
Method 3. Recording iPad Screen on Mac via QuickTime – Wired Way
By making use of QuickTime, you are able to record iPad screen without the need to download third-party apps and also sacrifice your pocket. As long as your iPad is running iOS 8 or later, your Mac computer is powered by OS X Yosemite or later, and there is a Lightning cable, you can connect your iPad to Mac and realize iPad screen recording.
Step 1. Connect your iPad to your Mac using Lightning cable.
Step 2. Open QuickTime on your Mac.
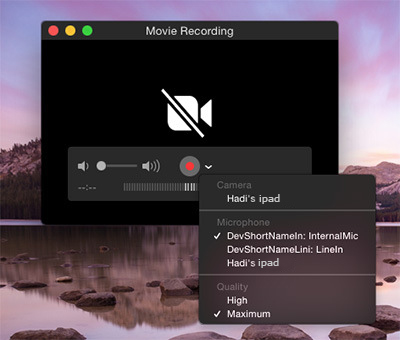
Step 3. Click File and then choose “New Movie Recording”.
Step 4. When a recording window appears, click the little arrow next to the record button and select your iPad from the drop down menu.
Step 5. Select the Microphone of your iPad if you want to record the audio.
Step 6. Click on the Record button to start recording, and do operations on your iPad.
Step 7. When finishing, click the stop button and save the video.
Notice: If you want to trim a video to keep only the relevant part, you can hit Cmd+T before saving the video to realize that.
Cons of this way:
* It is a wired way.
* Only available on Mac computer.
Method 4. Screen Recording iPad/iPhone on Mac/Windows via 5KPlayer – Wireless Way
Like QuickTime Player, 5KPlayer is also a media player which supports iPad/iPhone screen recording . Through AirPlay protocol in both iPad/iPhone and 5KPlayer, 5KPlayer can receive screen mirroring from iPad/iPhone and then record the screen. Unlike QuickTime, it is a wireless way that there is no cable to tie you down.
Step 1. Free download 5KPlayer on your Mac or PC, install and launch it.
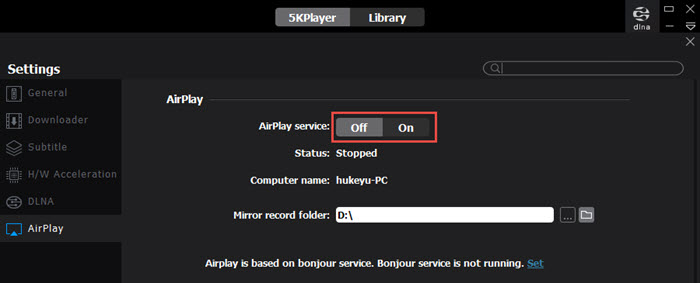
Step 2. Click on the “DLNA AirPlay” icon on the main UI of 5KPlayer to access the Settings window to turn on 5KPlayer’s AirPlay option. Then, go back to the main UI.
Step 3. Connect your iPad and your computer to the same WiFi network.
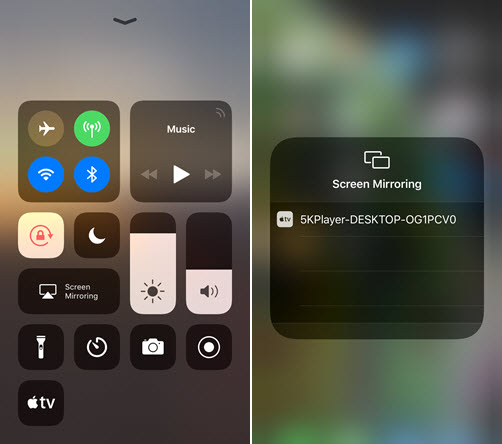
Step 4. Swipe up from the bottom of any screen if you have an iOS 11 iPad, or swipe down from the upper-right corner of the screen if you have an iPad with iOS 12 or iPadOS. Tap Screen Mirroring and then choose 5KPlayer to connect from the list.
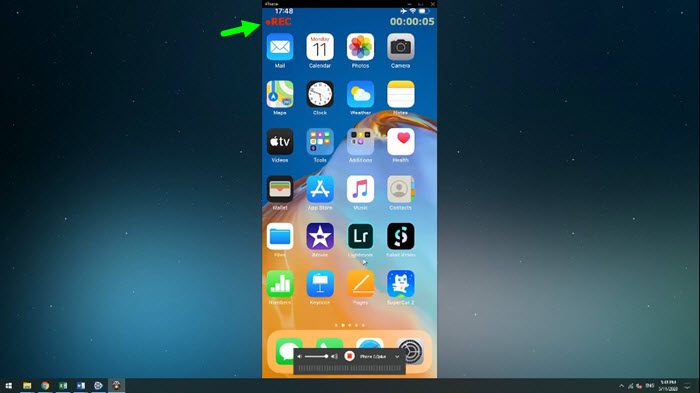
Step 5. Now, you can see your iPad screen has been cast to your computer. Just hit the red circle on your computer to start recording and click the icon again to stop. The recorded video will show in “AirRecord” playlist in the Library of 5KPlayer.
Cons of this way:
* Need installation.
* Need WiFi.
BTW, you can also edit your recorded video to keep the good and trim out the bad by playing the video via 5KPlayer and then click the “scissors” icon to start.
As an AirPlay-enabled 4K video player, 5KPlayer has improved its AirPlay feature to help you stream contents from iPhone iPad to Mac/PC wirelessly, smoothly and with no quality loss. You can stream videos and music, play iOS games , and display photos, presentations, apps and files easily. Also, screen recording them in case needed.


Also read:
- [Updated] Best 10 Sound Boosting Software PC, Mac & Mobile for 2024
- In 2024, VN Video Editor PC Review A Quick Overview
- New 2024 Approved Stop Background Noises & Add Exclusive Audio Selections in Movie Maker for Windows
- SSD 選び方 : MBR vs GPT どちらを選べば良いか 明確にする
- The Ultimate Guide: Top 5 Best ID3 Music Tag Editors for Windows & macOS
- Top 35 Amazing Tablet Bargains During Prime Day 202N: Exclusive Offers Not Yet Expired!
- Top 5 Professional Apps for Eliminating Audio Background Noise Efficiently
- Top Apps and Online Tools To Track Samsung Galaxy A25 5G Phone With/Without IMEI Number
- Top Strategies for Minimizing MP3 Audio Files with Audacity: A Step-by-Step Guide
- Top-Ranking WAV Compression Tools: Find Your Perfect Choice
- Ultimate Guide: Crafting Melodies with Top-Notch Audio Loops on Windows and Mac
- Title: Four Methods for Capturing Screenshots on Your iPad
- Author: Kenneth
- Created at : 2025-02-16 19:41:26
- Updated at : 2025-02-19 17:35:02
- Link: https://media-tips.techidaily.com/four-methods-for-capturing-screenshots-on-your-ipad/
- License: This work is licensed under CC BY-NC-SA 4.0.